This is a temporary page for those interested in testing Scapegoat yourself. The development stack relies on multiple different programs that make up the full environment.
Once Scapegoat is in a playable state, this will be a single installer or executable and be much more portable.
There are four components to running Scapegoat in a bare minimum development environment:
- Ewe - A re-implementation of the Ubiservices account API that Hyperscape connects to. This is used to replace some invalid or dead Ubisoft API calls with pre-defined responses that the game accepts.
- mitmweb - A program of mitmproxy to watch and redirect network traffic via a browser-based GUI. Currently, requests are only redirected to your local Ewe instance.
- Spring - A custom made launcher for Ubisoft games, specifically HyperScape. This disables the anti-cheat, bypasses license checks and emulates certain Ubisoft Connect function calls. Ubisoft Connect is still required, as some of the original functions are still used as they do not require a Ubisoft account to work.
- Scapegoat/Patsy - The primary client mod for Scapegoat, used for logging, debugging and replacing deprecated game behaviour. In the future, this will be much lighter when logging is mostly stripped out, however it may also be used for extending game features.
In the future, mitmweb will not be necessary and Ewe will be hosted on official Scapegoat servers. Spring and Scapegoat/Patsy will be installed via an installer.
If you have Git and access to the Scapegoat GitHub repositories, you can clone each of the required repositories:
- git clone https://github.com/ScapegoatHS/Ewe
- git clone https://github.com/ScapegoatHS/Scapegoat
- git clone https://github.com/ScapegoatHS/Spring
Otherwise, obtain a download of the sources by some other method, for example as a .zip file on each of them:
 .
.
Record the path of your Hyperscape installation directory, for example D:\Ubisoft\Hyperscape.
[!IMPORTANT]
The path cannot contain unicode characters due to technical limitations, this will be fixed in a later version of Scapegoat.
Inside ./Spring:
- zig build --prefix "D:\Ubisoft\Hyperscape"
This will build the launcher and plugin manager.
Inside ./Scapegoat/patsy:
- zig build --prefix "D:\Ubisoft\Hyperscape"
This will build the client mod.
The folder structure should now look like: HyperScape\ Spring\ Plugins\ Patsy.dll Spring.dll Hyperscape.exe SpringLauncher.exe ...
[!TIP]
You can now launchSpringLauncher.exeinside your Hyperscape directory to test that the game launches into the pre-login splash screen.
Using your system Environment Variable manager, define two user variables:
- SG_UBI_USERNAME - Your Ubisoft account email.
- SG_UBI_PASSWORD - Your Ubisoft account password.
[!NOTE]
Your credentials are never sent to Scapegoat servers, they are exclusively used for the following HTTP request when first logging in:https://public-ubiservices.ubi.com/v3/profiles/sessions. This is used as an alternative to the tickets given by Ubisoft Connect, which are essentially session tokens. Since Scapegoat uses its own launcher, it is much simpler to create a new session each time with the username and password. For security reasons, consider removing these variables once done.
Inside ./Ewe, run:
- composer install
- cp .env.example .env
- php artisan key:generate
- php artisan serve
Inside ./Ewe/proxy_scripts, run:
- mitmweb -s proxy.py
This will launch a proxy in your browser designed to route certain requests to your Scapegoat Ewe instance.
[!IMPORTANT]
You may have to install mitmproxy's CA certificates so that Hyperscape recognises valid requests made through the proxy. See https://docs.mitmproxy.org/stable/concepts/certificates/ for more information.
After launching the game by running SpringLauncher.exe, you can now enable proxy redirections.
In the mitmweb browser page:
- Open the Capture tab
- Enable Intercept traffic for ...
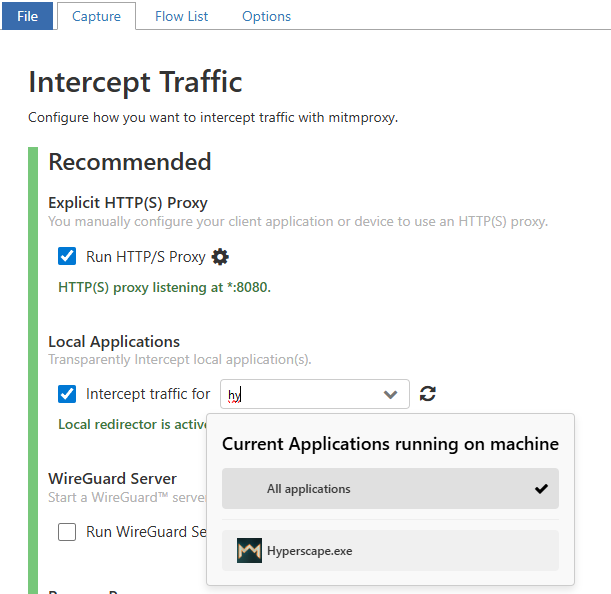 .
.
You should now be able to press any key in the HyperScape splash screen to play the game.
When closing the game and restarting, it is highly likely that you will need to restart mitmweb again and re-enable
traffic interception for HyperScape. Essentially, close mitmweb in the console and repeat steps 5 and 6.
Spring outputs all game logs to the Spring/output.txt file. This file overwritten when re-launching Scapegoat.
